
The article describes the main terms and rules used in PDFFlow and provides basic instructions on creating documents and configuring their layout.
Before you start
Before you start to create a document, you need to define its structure. For example, if you create a document like a Boarding Pass, you will need to use paragraphs, images, tables for flexible layouting, and lines to separate your document into parts.
Below you can find descriptions of all content elements that can be used in a document and brief instructions on working with them.
Document
A document is a document model that consists of sections. After you call the method DocumentBuilder.Build(...), all sections are built into a PDF
document and then saved to a file or to a stream System.IO.Stream.
Also, you can use a separate element in the document - a table of content (TOC). It is created in a separate section that starts on a new page.
For more on creating documents, see the Creating Document article.
Section
A section contains information about the content and layout of one or more document pages. For most documents, you will use only one section. You will have to use several section only if your document has repeating blocks of content. for example, you generate a book and need to repeat the text "Introduction" in the header of the Intro part on each page, and then need to repeat the text "Chapter 1. Basics" in the header of the Basics part. To get such a document, you need to create a separate section for each part, and configure the repeating areas for each of the sections.
For more on adding sections and section content, see the Adding Section article.
Paragraph
A paragraph is a block of content that consists of one or more text elements and may include inline images. You can set formatting for an entire paragraph:
    var documentBuilder = DocumentBuilder.New();
    var sectionBuilder = documentBuilder.AddSection();

    sectionBuilder
        .AddParagraph("Gehtsoft USA, LLC")
        .SetBackColor(Color.Red);
or for its elements separately:
    var documentBuilder = DocumentBuilder.New();
    var sectionBuilder = documentBuilder.AddSection();

    ParagraphBuilder paragraph = sectionBuilder.AddParagraph();
    paragraph
        .AddText("Gehtsoft USA, ")
        .SetBackColor(Color.Blue);
    paragraph
        .AddText("LLC")
        .SetBackColor(Color.Red);
By formatting text elements, you can set formatting for a particular word, a part of a sentence, etc. for example, making the font bold or italic.
You can add inline images, that is, images in text to paragraphs. We recommend to use inline images only if they have approximately the same height as the text, otherwise, your text will be shifted down, and this behavior cannot be changed. If you want to place an image and a text on the same level and have an ability to configure the image size and shift the text and the image, use a table with two columns hiding its borders if necessary.
Nota that you cannot control the width and height of a paragraph. A paragraph width is defined by the available section width. As for a paragraph height, if it doesn't fit into one page, it is continued on the next page automatically.
To restrict the area for printing a paragraph by width and height, add a table and place the paragraph in its cell. The paragraph is located strictly in the provided area and never extends beyond its borders. If there is not enough space in a cell to print the paragraph, you can set the TextOverflowAction option that defines the action for the paragraph in the case of insufficient space:
    var documentBuilder = DocumentBuilder.New();
    var sectionBuilder = documentBuilder.AddSection();
 // Table with one cell, 150pt in width and 100pt in height
    var tableBuilder = documentBuilder.AddTable(150f);
    tableBuilder
        .AddRow()
        .SetHeight(100f)
            .AddCell()
                .AddParagraph("Very long text here")
                .SetTextOverflowAction(TextOverflowAction.Ellipsis);
For more on adding paragraphs and adding content to paragraphs, see the Adding Paragraph and Adding Content to Paragraph articles.
Image
You can use images in the JPEG or PNG format in your documents. Images can be loaded from files or represented as an array of bytes.
The image size is defined based on the scaling mode:
User-defined - the user defines the image size.
Original size - the image has its original size.
Stretch - the image is stretched proportionally by height when its width is changed.
None - the default mode that is a combination of the other modes with the following priority: user-defined, then original size, then stretch.
For more on adding images, see the Adding Image article.
Line
A line is a rectangular figure for filling an area in a document. A line can be used to separate elements located vertically and horizontally.
You can configure both the length and the width of a line.
Example of using a line:
    var documentBuilder = DocumentBuilder.New();
    var sectionBuilder = documentBuilder.AddSection();

    sectionBuilder.AddLine(length: sectionBuilder.PageSize.Width, width: 0.5f);
This code generates a thin horizontal line stretching to the section width.
To create a vertical line, specify the line width as its length:
    var documentBuilder = DocumentBuilder.New();
    var sectionBuilder = documentBuilder.AddSection();

    sectionBuilder.AddLine(length: 0.5f, width: sectionBuilder.PageSize.Height);
Actually, there are no vertical lines in the library, but you can create them by placing the above code into a repeating area or a table cell with a small width. If you add a line to a repeating area, the area should be also high enough.
For more on adding lines, see the Adding Line article.
Table
A table is a grid of cells organized into rows and columns. In PDFFlow, the width of columns is specified when you create a table:
TableBuilder table = sectionBuilder.AddTable(150f, XUnit.FromPercent(100), 200f);The above code says that a table has three columns of 150pt, 100% and 200pt width respectively. If the total table width is 500pt, then `100% = 500pt - 200pt - 150pt = 150pt`, so we have three columns of 150pt, 150pt and 200pt width.
After you add rows, the width and number of columns (and cells) cannot be changed.
To start creating a table, after adding columns, add rows:
TableRowBuilder row = table.AddRow();Now you should call .AddCell(...) three times for the row to create three cells. Repeat this step for each subsequent row you will create.
Each created cell will have the same width as the corresponding column.
TableCellBuilder cell = row.AddCell(...);Finally, a cell is the element to which you can add content - paragraphs, images, and nested tables.
Tables, rows and cells have a specific feature - they have borders on the top, right, left, and bottom. The borders are flexibly configurable and inherited. For example, if you set formatting for row borders, the borders of all cells in the row will change. You can also set the row height which allows you to restrict it from increasing.
For more on working with tables, see the Adding Table article.
Basic layouting
Elements in a document follow each other and are placed under one other. Let's take a simple code example:
    var documentBuilder = DocumentBuilder.New();
    var sectionBuilder = documentBuilder.AddSection();

    sectionBuilder.AddParagraph("Line 1");
    sectionBuilder.AddParagraph("Line 2");
    sectionBuilder.AddParagraph("Line 3");
This code will generate the following:
As you see, the text elements are placed one after another. Such layouting is typical for all document elements, including images, tables, lines, and paragraphs.
You need to place a header in the center, then place an image on the left, and a text with the company name on the right. How to do this? Use the following code:
    var documentBuilder = DocumentBuilder.New();
    var sectionBuilder = documentBuilder.AddSection();

    sectionBuilder
        .AddParagraph("Title")
        .SetAlignment(HorizontalAlignment.Center);
    sectionBuilder
        .AddLine(sectionBuilder.PageSize.Width, 0.5f);
    sectionBuilder
        .AddImage(imagePath, ScalingMode.OriginalSize);
    sectionBuilder
        .AddLine(sectionBuilder.PageSize.Width, 0.5f);
    sectionBuilder
        .AddParagraph("Gehtsoft USA, LLC")
        .SetAlignment(HorizontalAlignment.Right);
This code will generate the following:
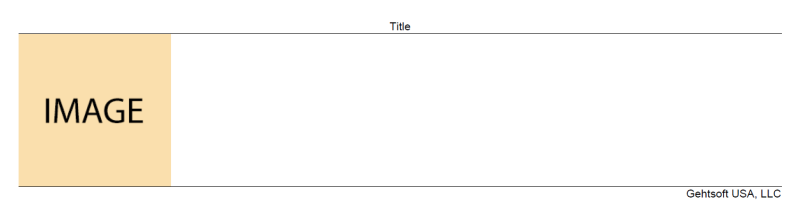
The lines are used to show that the element are placed under each other. Even if the header is located in the center and there is available space on the left, the image will be located under the header.
Repeating areas
A repeating area is an area that repeats on pages of a section for which this repeating area was created. The repeating can be specified for both odd and even pages, only for even pages, and only for odd pages. Note that a section can have multiple repeating areas. You can add any content to a repeating area: paragraphs, tables, etc.
There are two types of repeating areas:
Automatic - the coordinates of such a repeating area are calculated automatically and the document flow area (see below) is reduced and shifted accordingly by the library. You can add automatic repeating areas using the methods `AddHeader...`, `AddFooter...`, `AddRptAreaLeft...`, and `AddRptAreaRight...`. The repeating areas are placed at the corresponding margins of the section and extend to its available width (header and footer), or height (left and right repeating areas).
By coordinates - the coordinates of such a repeating area and its size are specified by the user. You set the distance from the left and top margins of the section as the X and Y coordinates and the width and height of the repeating area. For example, if you need to place a QR code on each page at the left and right margins of your document and it should not occupy the entire available width or height of the section but, say, 100x100pt, a repeating area by coordinates will be a perfect solution.
When you use a repeating area by coordinates, you should specify the position and size of the document flow area (see below) manually, because the library cannot determine where you want to place the document flow when you specify the position of your repeating area manually.
For more on adding repeating areas, see the Adding Repeating Area article.
Document flow area
A document flow area - is an area to which the section content is added. By default, the size of the document flow area is equal
to the size of the section, that is, occupies the entire available area. You can specify another size of the document flow area by coordinates
calling SectionBuilder.SetPosition(...).
Setting the size of the document flow area is required when you use repeating areas by coordinates. Actually. you do not have to change the size of the document flow area when you need to reduce the area for printing the document content - we recommend configuring the section margins instead.
For more on adding document flow areas, see the Adding Document Flow Area article.
Advanced layouting using tables
When you need to place elements in one line, not one after another, we recommend using a table for this purpose. If you want to create a complex block of content where some of the elements are located on the same level, not after one another, create a table and nest other tables in it, if necessary. If you need to place one element so that it occupies two cells, you can merge the cells (specifying colspan or rowspan).
But it is important to note that all elements in any cell are placed after one another in any case.
For more on adding layouting using tables, see the Layouting Using Tables article.
Margins and paddings
You can set the distance of an element from its parent element (container) or from its neighboring elements.
The margin is an area around an element, the padding is the area between the borders of a container and its elements. A container is an element that can contain other elements. Examples of containers are a section, a repeating area, and a table cell.